

We use cookies to improve your experience when using our site. For example, cookies will help us remember you and will assist us in showing you content we think you'll be interested in. To find out more, read our Privacy Policy
To apply for careers, cookies are necessary for the applications to run properly. Please accept cookies for processing your information. Rest assured, your information will not be shared.
By clicking "OK", you consent to our use of cookies
Fall is finally here, and with it comes crisp weather, cozy sweaters, crunchy leaves, and lots and lots of fun fall crafts. Whether you’ve been waiting all summer for a spooky Halloween with jack-o’-lanterns and spiderwebs, or your family’s fall harvest with scarecrows and pumpkins, we’ve got a craft you’re sure to love.
We’ve compiled crafts that are perfect for an autumn birthday party, a Halloween party, or just a rainy fall Saturday that needs a lift.

If you’re looking for a pumpkin-decorating idea that doesn’t lead to finding pumpkin seeds on the floor for the next few weeks, look no further than painted pumpkins. Painting pumpkins instead of carving them is safe for young kids, and it unlocks a new layer of creative possibilities! You can paint your pumpkins into any shape or design, but we’re especially smitten by these ice cream pumpkins.
To make them as pictured, you’ll need:
First, paint the pumpkins with one or two layers of paint. You can stick with the classics — white, pink, and brown for chocolate, strawberry, and vanilla — or get creative and paint in chocolate chips, fudge swirls, or whatever else makes up your favorite flavor.
When you’ve got the paint on, it’s time to focus on sprinkles. Using the cardstock, cut narrow strips horizontally, then cut those strips vertically into sprinkle-sized pieces. Glue a smattering of the sprinkles to the top and sides of your pumpkin ice cream scoops, and then scatter more around.
You can display your scrumptious pumpkins in a bowl, stacked like scoops on Joy Mini Cups (like we did above), or spread out on a table. We think they would look especially adorable stacked in enJOY-a-Bowls® at a party where you’re serving ice cream.
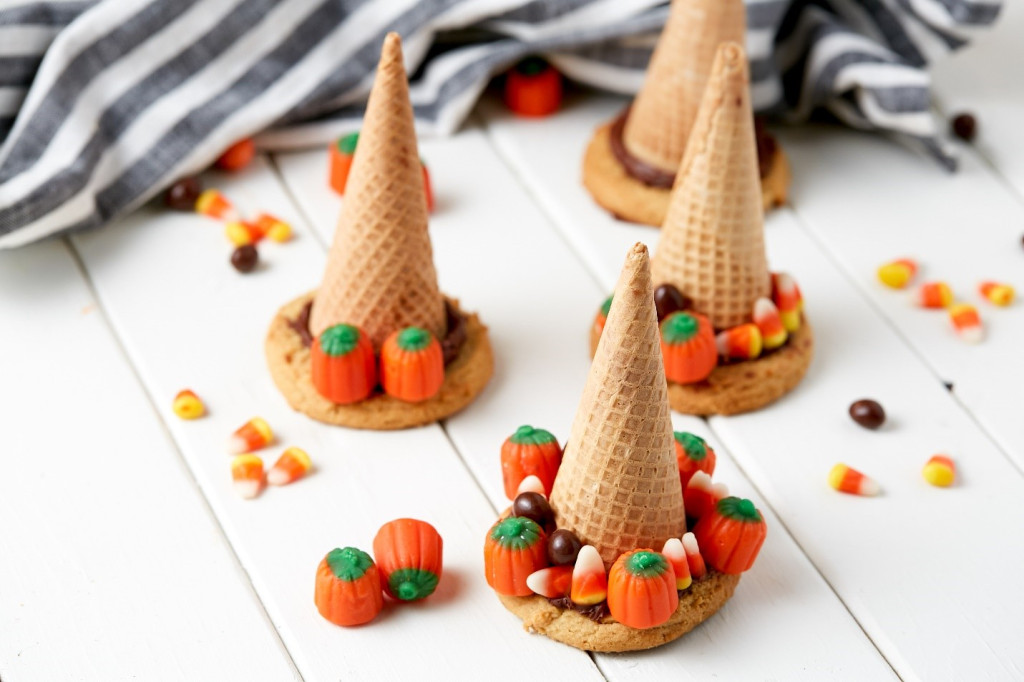
If you prefer crafts that pull double duty as delicious snacks, we’ve got just the thing for you. These witches’ hat ice cream cones are filled with candy for the best kind of surprise. We think they’d be great as party favors!
You’ll need:
First, fill your sugar cones with candy, then, continuing to hold the cone upright, pipe frosting around the rim of the cone. Place a cookie flat against the cone, and, holding both pieces, flip the structure over to sit it cookie-side down. As the frosting hardens, you can decorate the outside of the cone with your Halloween candies to make your own unique witchy designs.
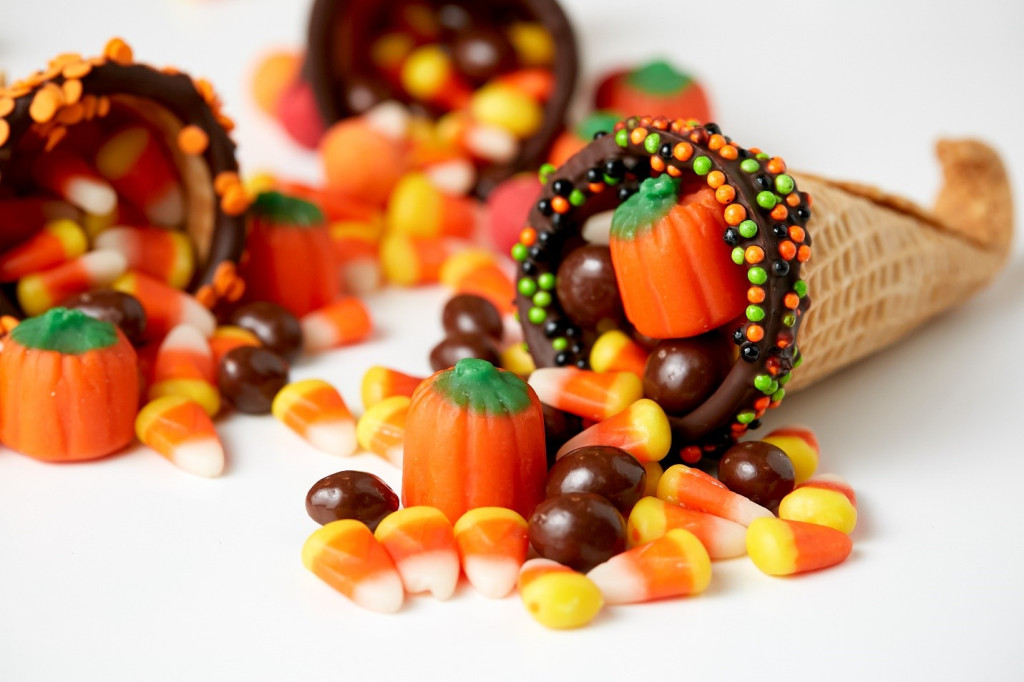
Cornucopias signify abundance and we can’t think of anything more abundant than a stack of Joy Sugar Cones loaded with fall candies. We’re going to give you two options for this craft: a 5-minute, it’s-really-that-easy version, and a 20-minute, master-of-the-details version.
For the first version, all you need is:
We love the idea of buying special fruit or pumpkin-shaped candy to mimic what would be in an actual cornucopia. A special trip to the candy store to pick out filling might make this craft even more fun! Fill each cone with candy. You can set the cones on a tray or wrap them in gift bags to hand out.
The longer version will get you the quintessential cornucopia curve in the cone.
Here’s what you’ll need:
To make the cornucopia cones, dampen a paper towel and drape it over just the ends of two sugar cones on a microwave-safe plate. Microwave the cones for 20-30 seconds. While the cones are still hot, use the dowel to curl the end of each cone up. You’ll place the dowel over the cone tip and curl the tip around the dowel. As the cone cools, it will harden into that shape. Once your cones have cooled, fill them with candy.
Whichever version you choose, you can always gussy up the cone with a rim dipped in melted chocolate and rolled in fall-inspired candies or sprinkles for an even more autumnal look.
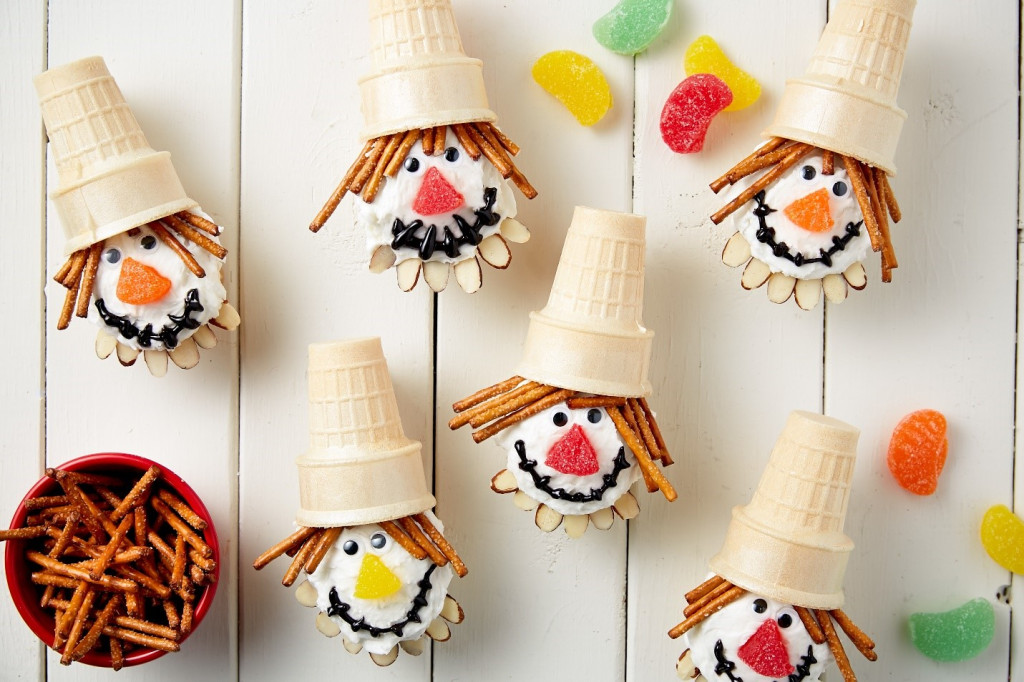
These adorable treats will steal the show, and they’d make a great companion to a Dorothy from “The Wizard of Oz” costume. You only need a few things to put them together, but make sure to wait for your cupcakes to be entirely cool before you get to work.
For the cupcakes, you’ll need:
If using homemade cupcakes, frost the top with white frosting. Then add googly eyes, a jelly candy nose (cut down to size, if necessary), and a frosting mouth with crosshatches. Then you can line the bottom and top with almond or pretzel “straw” and top the scarecrow with a Joy Cone hat.
Just remember, if you opted for plastic googly eyes, take them off before eating your fun fall craft!
If you want to rep your favorite snack for Halloween, we don’t blame you! There are two fun and easy ways to put together your ice cream cone costume.

You’ll need:
To make your “sprinkles,” paint the popsicle sticks with bright paint for rainbow sprinkles or brown paint for chocolate sprinkles. Glue the popsicle sticks all over the front and back of the shirt and skirt/pants. To make your “cone,” draw the cone lattice lines across the brown construction paper with your marker, roll the paper into a hat, then staple, tape, or glue it into place. To keep it on your head, you may want to punch a hole in both sides above your ears and attach pieces of string to tie it onto your head.
You’ll need:
First, you’ll make the ice cream scoop, or scoops! Spread the T-shirt over a flat surface and arrange the pompoms into the shape of ice cream scoops. One at a time, glue them down to the shirt. When you finish, you’ll have a 3D, fuzzy-ice-cream masterpiece. With this costume, your legs in brown tights or pants are the cone. If you want, you can take it up a notch by painting your tights or pants with lighter brown stripes like the lattice in an ice cream cone.
These festive centerpieces are the perfect activity to keep busy and get creative on a quiet afternoon, and you probably already have all the supplies on hand.
You’ll need:
First, cut out paper “leaves” from the construction paper until you have a stack that rivals the one outside in the yard. Then, assemble your trees. Starting with an upside-down sugar cone, glue the leaves onto the cone until it’s completely covered. Voila! You have fall foliage you can appreciate in the comfort of your own home.
For more crafting and recipe ideas, connect with us through our e-newsletter and share your favorite Joy Cone creations with us on Facebook and Instagram at @JoyConeCo.
Top
Recent Comments